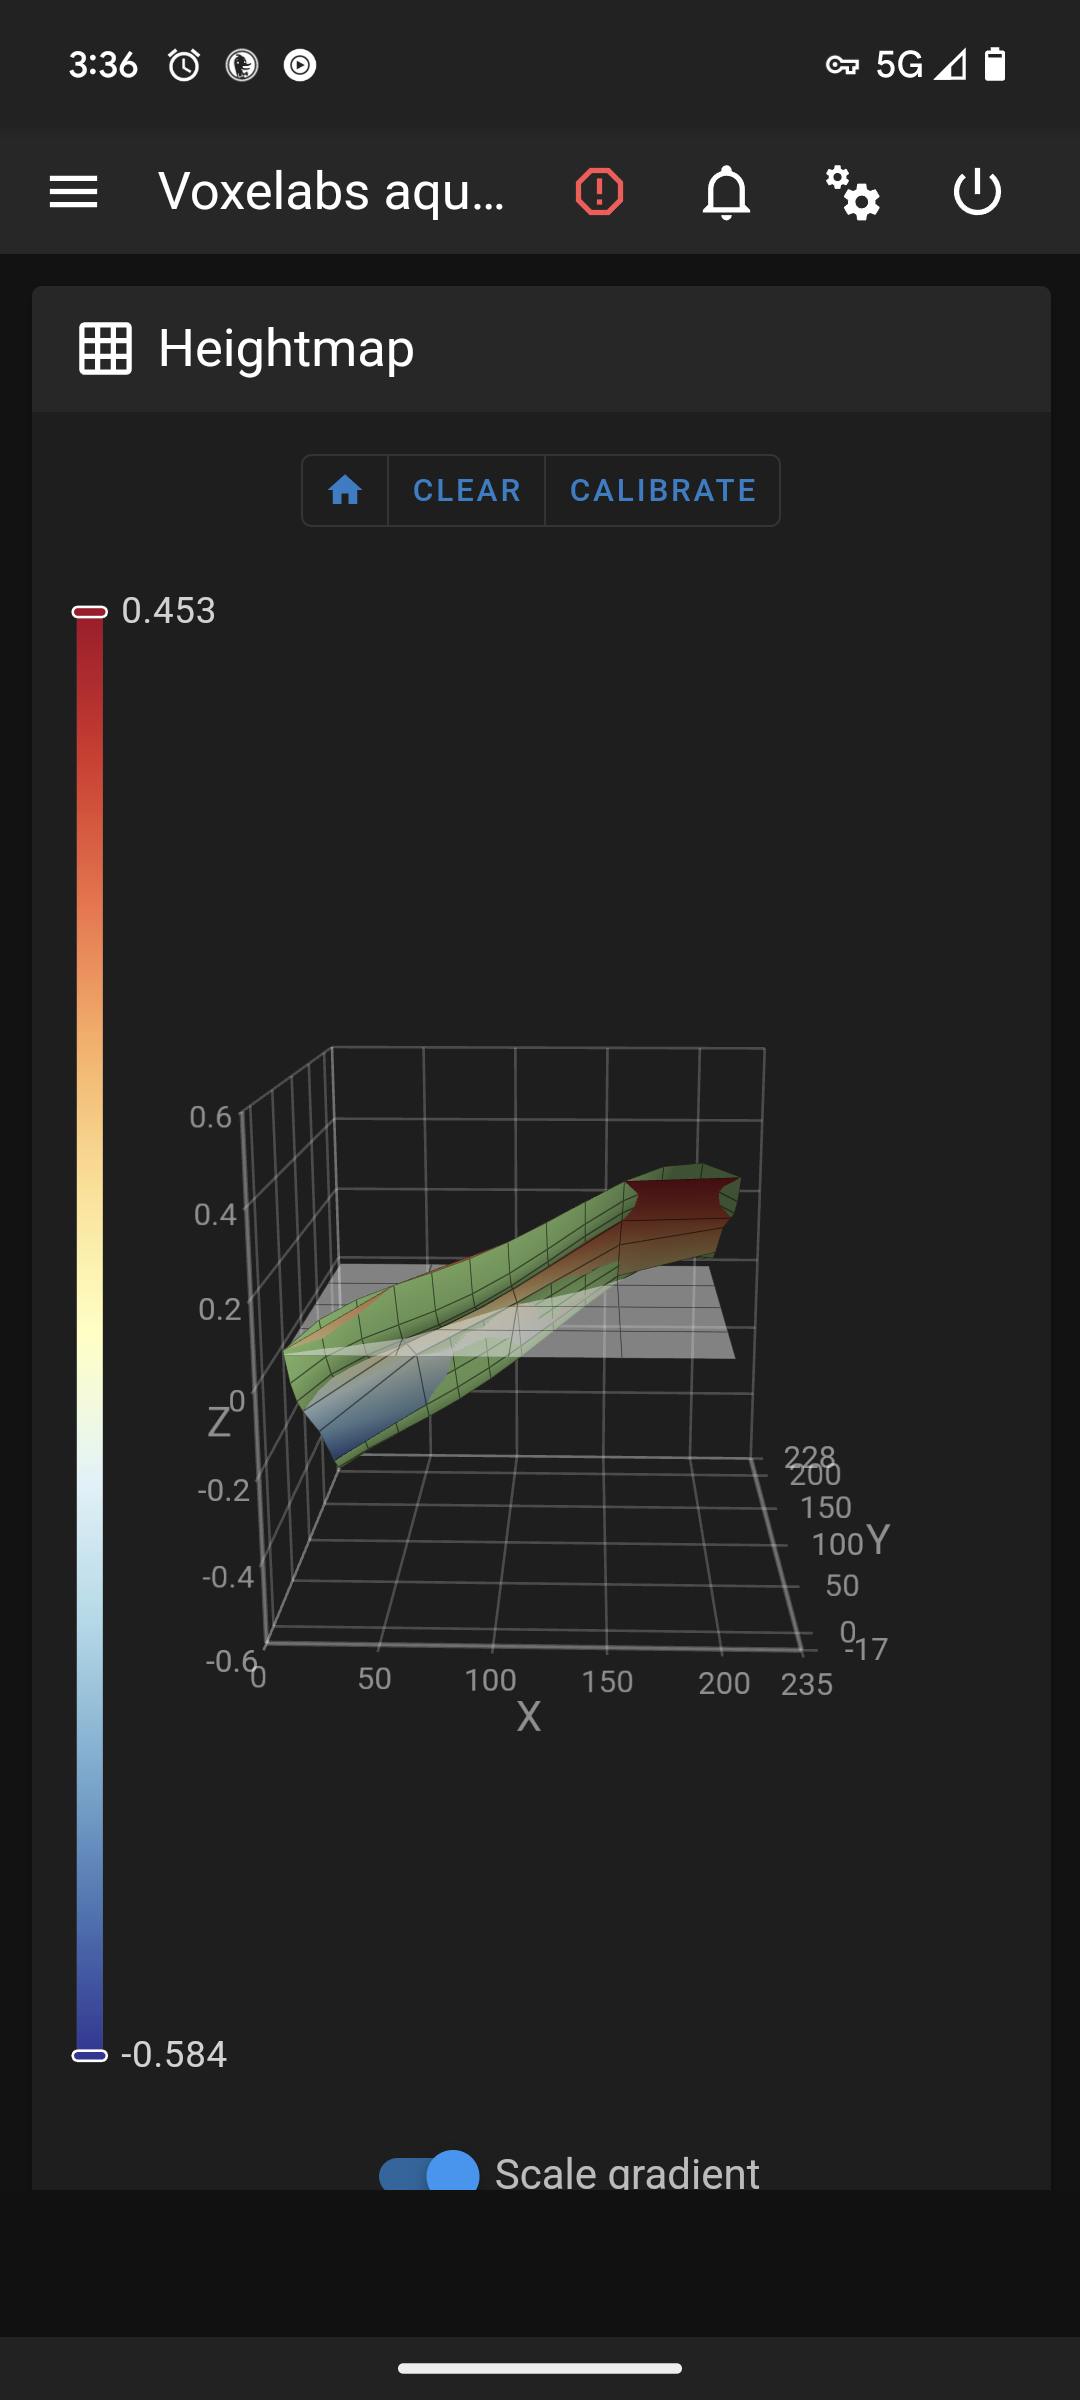
I am finally reaching out as I am at my wits end and need experienced people to help me resolve my printing issue.
I have a Voxelabs Aquila (Ender 3 v2) formerly running marlin with small but manageable annoyances like overhang and manual bed leveling and thus began my journey after a year of using Aquila to start modding/upgrading the thing.
First thing i did was upgrade the fans and shroud, this improved prints slightly but was still not satisfied.
Moved to Klipper and added BLTouch and this is where all my problems started. After hours of following guides and troubleshooting of setting them both up, i still get very little bed adhesion and layers are not smooth together (gaps) with the same 3d slicing software i have been using before the switch (yes changed it to Klipper firmware in slicer)
As you can see in the picture this is after a manual bed level. Where do i go from here?
Edit 2: fully cleaned nozzle, hotend, and bed without any other changes with same results.
Edit 1: forgot to add my printer.cfg
[include mainsail.cfg]

[stepper_x]
step_pin: PC2
dir_pin: PB9
enable_pin: !PC3
microsteps: 16
rotation_distance: 40
endstop_pin: ^PA5
position_endstop: 3
position_max: 235
homing_speed: 50

[stepper_y]
step_pin: PB8
dir_pin: PB7
enable_pin: !PC3
microsteps: 16
rotation_distance: 40
endstop_pin: ^PA6
position_endstop: -17
position_max: 228
position_min: -17
homing_speed: 50

[stepper_z]
step_pin: PB6
dir_pin: !PB5
enable_pin: !PC3
microsteps: 16
rotation_distance: 8
endstop_pin: probe:z_virtual_endstop
#position_endstop: 0.0
position_max: 250
position_min: -6

[extruder]
max_extrude_only_distance: 100.0
step_pin: PB4
dir_pin: PB3
enable_pin: !PC3
microsteps: 16
rotation_distance: 34.406
nozzle_diameter: 0.400
filament_diameter: 1.750
heater_pin: PA1
sensor_type: EPCOS 100K B57560G104F
sensor_pin: PC5
#control: pid
# tuned for stock hardware with 200 degree Celsius target
#pid_Kp: 21.527
#pid_Ki: 1.063
#pid_Kd: 108.982
min_temp: 0
max_temp: 250

[bltouch]
# Can't move this configuration to include because of z-offset adjustment
sensor_pin: ^PB1
control_pin: PB0
x_offset: -28
y_offset: -15
#z_offset = 0
samples: 2
speed: 2
#pin_move_time: 0.500
#probe_with_touch_mode: False
#pin_up_reports_not_triggered: True
#pin_up_touch_mode_reports_triggered: True
#stow_on_each_sample: False

[safe_z_home]
home_xy_position: 125,125 #this should be the center of your bed
speed: 50
z_hop: 10
z_hop_speed: 5

[bed_mesh]
speed: 80
horizontal_move_z: 5
mesh_min: 3, 33       #!!min and max co-ords are based on the probes location not the nozzle!!
mesh_max: 207, 213  #needs to be calibrated for your individual printer
probe_count: 5,5 #this is the number of probing points on X then Y axis
mesh_pps: 2,2
fade_start: 1
fade_end: 10
fade_target: 0

[bed_screws]
screw1: 25, 25
screw2: 195, 25
screw3: 195, 195
screw4: 25, 195

[heater_bed]
heater_pin: PA2
sensor_type: EPCOS 100K B57560G104F
sensor_pin: PC4
#control: pid
# tuned for stock hardware with 50 degree Celsius target
#pid_Kp: 54.027
#pid_Ki: 0.770
#pid_Kd: 948.182
min_temp: 0
max_temp: 130

[fan]
pin: PA0

[mcu]
serial: /dev/serial/by-id/usb-1a86_USB_Serial-if00-port0
restart_method: command

[printer]
kinematics: cartesian
max_velocity: 300
max_accel: 3000
max_z_velocity: 5
max_z_accel: 100

#*# <---------------------- SAVE_CONFIG ---------------------->
#*# DO NOT EDIT THIS BLOCK OR BELOW. The contents are auto-generated.
#*#
#*# [extruder]
#*# control = pid
#*# pid_kp = 31.251
#*# pid_ki = 2.510
#*# pid_kd = 97.268
#*#
#*# [heater_bed]
#*# control = pid
#*# pid_kp = 69.577
#*# pid_ki = 1.022
#*# pid_kd = 1184.541
#*#
#*# [bltouch]
#*# z_offset = 3.609

Any suggestions for good UPS that doesnt break the bank? Maybe ill just mod my old ones and use car batteries.