DIY

2839 readers
111 users here now

Share your self-made stuff and half-baked projects here.

Also check out !diy@beehaw.org

There is also a related XMPP chat.

founded 2 years ago
MODERATORS
101


(compiled from the Wikipedia page on jugaad)

102


I wrote this for !zerowaste but it kind of feels like a better fit for diy.

https://i.imgur.com/oBgXyBW.jpg

I don’t have any in-progress pictures of this one, but it’s such a simple design I doubt you'll need them. I responded to a post on the local Everything is Free page where a guy was cleaning out all the lumber left under his porch. At the end of the week he had a dumpster coming and anything that hadn’t been taken he would throw away.

I loaded up my car with what I could fit, but there was this big roughcut 2x12 plank that looked like it had been used as scaffolding (paint marks and boot prints). It was too long to fit in my car but he was renting a chopsaw with the dumpster, so he offered to cut the board to length when they showed up and set it aside for me. So I was able to go back for it (ever since, I’ve brought saws, a tape measure, a square, and a marker with me whenever I pick up lumber). I asked him to cut it to a six foot length, and he even saved the extra for me, which worked out well because I made the rest of the bench out of it.

After having spent some time restoring fancy furniture, I wanted to try something more rustic. I cut the leftover material into three pieces, two legs/sides, and one square piece to cut in half diagonally for support. On the two uprights, I cut a decorative notch in the base, and tapered the sides. I had to use a hand saw for most of this as the skillsaw didn't like the thick plank.

https://i.imgur.com/akUnIBT.png

I nailed down through the top into the legs, then flipped it, put the 45s in place and drove screws through the angled surface into the legs and the underside of the bench. Then I drove screws in from the outside of the legs, and nails through the benchtop.

I gave the benchtop and sides a very casual sanding, just to knock away any splinters and rough spots, and urethaned it so it would last longer.

It's not as pretty as some of the things I've made, but it's strong, and simple, and was made out of wood I got for free and screws/nails/urethane I already had.

103
104
105
106
107
1
submitted 2 years ago* (last edited 2 years ago) by w_ortiz@beehaw.org to c/diy@slrpnk.net


This has been posted already, my bad, it's here : https://lemmy.ml/post/224388

Here is a short summary I (OP) made :

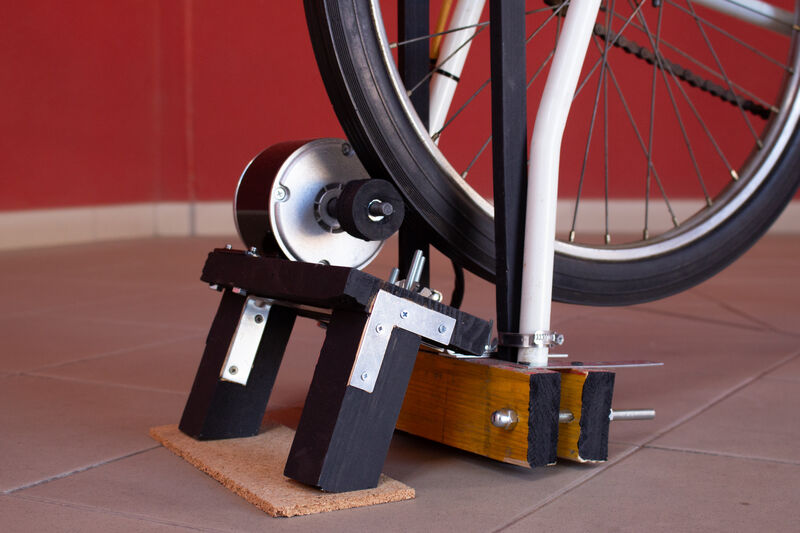
  • This one is a static exercise bicycle with no gears.

  • You also have to build a board to convert current / voltage on the output if you want to charge batteries or power electronic devices that are sensitive to power changes

  • Power output overview : "The power output (W) of a bike generator corresponds to the voltage (V) multiplied by the current (A). We obtained roughly 100 watts (12V, 8-9A) of power during a short and heavy workout. During a moderate effort – which we can sustain for a longer time – power production is between 45 and 75 watts. The power output not only depends on the bike but also on the person who operates it. Athletes could produce more power, while couch potatoes would (initially!) generate less."

  • The simple dynamo is under the wheel. So, much friction. A better system could waste less energy ?

108


Reminder :

  • Parallel wiring increases amperage and voltage stays the same. Each cell in a parallel circuit is wired positive to positive and negative to negative.

  • Series wiring (mostly what you will use for solar cells} increases voltage and amperage stay the same. Each cell in a series circuit is wired positive to negative, the remaining positive and negative are you leads. You'll notice batteries in flashlights installed in series.

109
110
1
SOLARPUNK LAB (solarpunklab.org)
submitted 2 years ago by TeZ@slrpnk.net to c/diy@slrpnk.net


building for the best while preparing for the worst

111
1
DIY Off-Grid Solar Primer (anarchosolarpunk.substack.com)
submitted 2 years ago by poVoq@slrpnk.net to c/diy@slrpnk.net
112
1
Recipes For An Off-Grid 'Internet' (anarchosolarpunk.substack.com)
submitted 2 years ago by poVoq@slrpnk.net to c/diy@slrpnk.net
113


https://lotide.fbxl.net/api/stable/posts/11405/href

This is a little project I worked on over the weekend once I realized that my Wii mini, which I previously didn't think could be very useful for me, could be set up with the homebrew channel using the bluebomb exploit.

I own a nes mini, snes mini, and playstation mini, and they're all neat toys, but the problem with all of them is that I can't really use them in my living room. The TV is mounted on the wall fairly high up, and I don't have a shelf or anything, and I don't feel like running 100 feet of USB cables all over the place just because I might want to play some super nintendo games once a year.

The Wii was a nice solution by itself. It's small, and you can plug a classic controller into the wiimote so you can play games wirelessly and tuck them into a basket for the 364 days you're not playing wii games.

The Wii mini is different from the Wii in that it's a much simpler device. It doesn't have an SD card slot, it doesn't have a wifi transciever, it can't use Ethernet at all in its unmodified form. Also, the device doesn't have a frontloading DVD drive like the wii, instead it has a top loading DVD drive like the original playstation, so you can't just simply bolt it to the wall with a piece of wood or strap or plastic like you could with a Wii, because you won't be able to open the DVD drive. Being able to run homebrew was the final straw that made the project viable and interesting.

My solution ended up being very simple: The sides of the wii mini are at an angle and come to a point. I measured the dimensions of that angle and created a wall mounted bracket, then printed 3 of them in PLA.

A standard Wii has many mounting brackets available since the Wii was the most popular game console of that generation, but the wii mini was a last gasp and so it isn't really popular and there aren't really options out there, so this is a perfect solution for home manufacturing.

I realized that the tolerances required to hold the wii mini using these was extremely tight, so I used a piece of lined paper to create a template by putting the Wii into its mounts sitting on the table, then I used a felt marker to mark drill holes. Even so, it wasn't as precise as I'd hoped, and I also had an issue with the anchors I used. I've used plastic screw in anchors on a few other projects and it wasn't a problem, but these anchors absolutely hated my living room wall, so that became way more complicated than I would have liked. It does work, but it's not perfect.

If I were to design something like this again, I would remove the requirement to perfectly mount the anchors by printing a piece of plastic holding the three pieces in the exact spot so I didn't need to mount them perfectly. I would probably try to make it a hangable holder so I could just put a couple hangers on the wall and hang the wii holder off of it rather than try to drill securely into the wall.

Regardless, it does work as you can see, and I'm happy enough with the results. My favorite prints are the ones that quietly become a permanent part of my life, and this is a great example of that. The Wii is being held behind my TV, hidden but accessible.
114
-1
Tom Stanton (www.youtube.com)
submitted 2 years ago by sj_zero@lotide.fbxl.net to c/diy@slrpnk.net


This guy does a lot of neat stuff. I watched a few electric bike videos he did where he tried building e-bikes with various features.